- 01: What is the Trex Plug-Based Decking Fastener System? →
- 02: Installing Trex Plug-based Decking Fastener System →
Features and Benefits
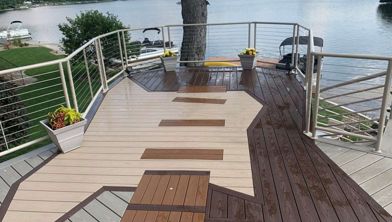
The Trex Plug-Based Decking Fastener System is designed to make installing your deck boards easy while creating a seamless deck surface. This system consists of a few key pieces: decking plugs, Trex's specialized composite decking screws, and the depth setting tool. With these solutions and the warranty that protects them, you can install your deck without worrying about unsightly hardware or lackluster quality.
Depth Setting Tool
- The Trex decking depth setter tool ensures a wobble-free installation, setting the screw to the perfect depth for your Trex screw plugs. This tool is sold separately from the Trex Decking Plug System Screws but is a must-have for those looking to reduce the hassle of installation.
Plugs
- The staggered strip design of the plugs makes these screw plugs for decks easy to handle and install efficiently. Made from Trex's proprietary shell material, they blend seamlessly with the board's shell for a flawless finish.
Composite Decking Screws
- Machine-cut slot: The machine-cut slot effortlessly pierces through the high-performance Trex shell, facilitating a smooth installation process.
- Lower threads and HEXSTIX: Unique tri-lobe lower thread design paired with patented HEXSTIX drive technology ensures a fast and wobble-free drive, enhancing efficiency and precision.
- Mushrooming elimination: Reverse threads and a unique head design prevent mushrooming around the screw head, resulting in a clean and polished finish.
Warranty
- It's backed by the same warranty as Trex decking when used with Trex Transcend, Transcend Lineage, and Trex Select lines, providing added assurance and peace of mind.
Step 1: Confirm product compatibility
Are you using Trex Enhance® decking or Trex fascia products? If so, the system will not be compatible. But don't worry, there are other solutions for these options. In fact, specific plug-based systems and installation videos are available for those products.
Step 2: Pre-drill
Pre-drill the deck board at a 90-degree angle using a 1/8” drill bit if screws are to be installed closer than 1” from a board end or edge.
Step 3: Install the Screw
Use two screws per joist or stair stringer, driving them at a 90-degree angle using the Trex decking depth setter tool. Ensure a continuous motion until the depth setter fully seats the screw to the design depth for the plug.
Step 4: Install the Plug
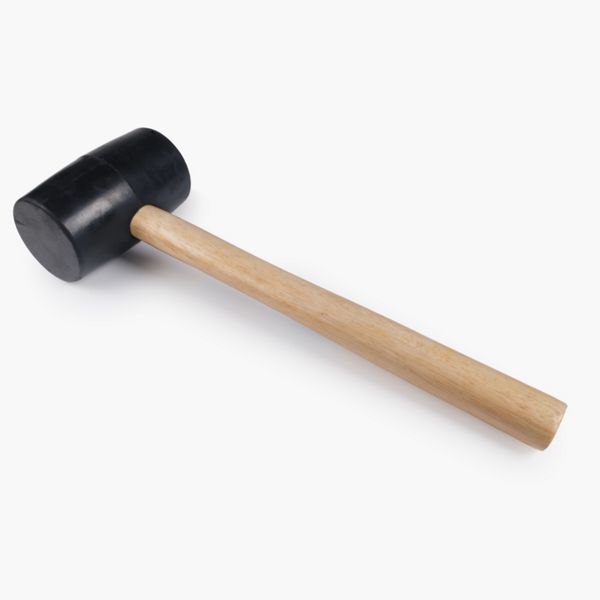
Clean the hole of any debris or water, then center the Trex screw plug over the hole and align the grain with the board. Press the plug into the hole and tap it flush with a smooth-face hammer for a professional finish.
By following these simple steps, you can easily become an expert at installing Trex Plug-Based Decking Screws for any project. This system will save you time and headaches, not to mention create a beautiful, seamless look to your deck. Now that you know how to install these hidden fasteners, purchase your own plugs to get started.


This content was partially or fully generated by AI and has been reviewed by our team to ensure accuracy and relevance.


Copyright © 2026 Trex Company, Inc. All rights reserved.
Photos and videos © 2026 Warner Bros. Discovery, Inc. or its subsidiaries and affiliates. All trademarks are the property of their respective owners. All rights reserved.
- Country
-
Australia
-
Austria
-
Bahrain
-
Brazil
-
Canada English
-
-
Chile
-
Colombia
-
Costa Rica
-
Cyprus
-
Czech Republic
-
Fiji
-
France
-
Germany
-
India
-
Ireland
-
Israel
-
Kuwait
-
Lithuania
-
Mexico
-
Netherlands
-
New Zealand
-
Norway
-
Oman
-
Qatar
-
Saudi Arabia
-
South Africa
-
Spain
-
Sweden
-
Switzerland
-
Turkey
-
United Arab Emirates
-
United Kingdom
-
United States
-
Venezuela
By choosing your country, you acknowledge that you have read Trex's Privacy Policy