
- 01: What to Consider Before Picture Framing a Deck →
- 02: Add Blocking to the Substructure →
- 03: Install the Picture Frame Boards →
- 04: Cut and Install the Infill Deck Boards →
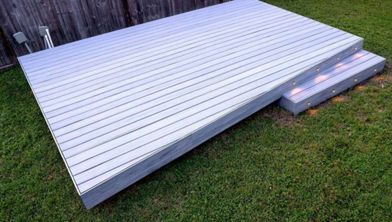
To elevate your deck design beyond the basics, try installing boards of either a contrasting or matching color around the deck's perimeter. This technique, known as picture framing, adds a captivating visual element and allows for accent colors. But even if you decide against using a new color, which is a popular choice among deck owners, there are still compelling reasons to consider a picture-framed deck.
By installing border boards through the center of a deck and creating multiple picture frames, you could eliminate the need for end-to-end/butt joints. You could use narrower 1x4 deck boards for these picture frame borders because the smaller profile helps break up longer runs and further reduces the number of visible joints. Another advantage of picture framing a deck is that it allows the border boards to overlap the fascia, which helps keep debris out of the spaces between the fascia boards and wood joists, extending the life of both boards.
Building a deck with a picture frame border isn’t difficult, but it does require extra construction steps and materials, as well as additional design and layout work. Here are some factors you should consider:
Step 1: Acquire the Necessary Materials
Picture Framing Requires Additional Joists
Depending on your picture frame deck layout, you will need to order four or more joists, two for each side of the deck (more on this below). You will also need additional fasteners, joist hangers, and flashing tape to accommodate those joists.
Choosing Border Boards

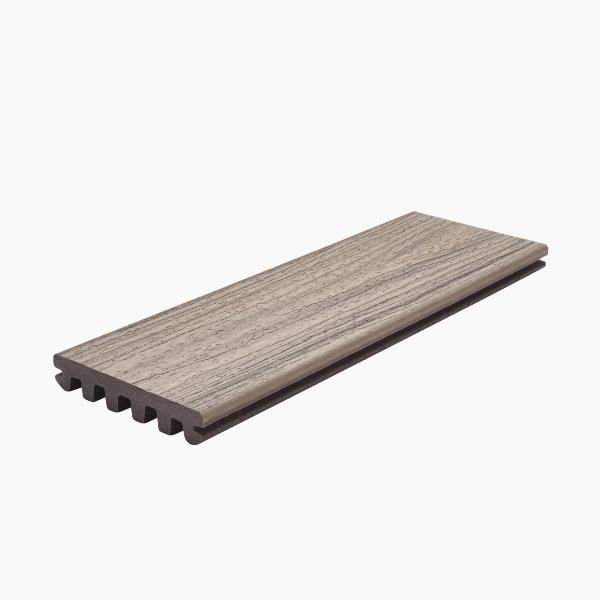
Because of the border boards’ orientation to the joists and the other deck boards, and the fact that one edge will be exposed, you will need to choose border boards with a square edge, not grooved. Some builders prefer narrower 1x4 composite boards for the picture frame because the roughly 4-inch-wide composite decking profile creates a crisp, finished border around the deck.
Trex offers square-edge boards across all decking collections, including Trex Enhance®, Trex Select®, and Trex Transcend® (including Lineage®), so you can picture frame your deck in the same color and finish as your field boards.
Trex grooved composite decking boards are designed for use with Trex Hideaway® Clips, but you will need a different type of fastener to secure the square-edge picture frame boards. The two most common options are Trex Hideaway® Color Match Composite Deck Screws and the Trex® Decking Plug System, which work across all Trex decking lines to create a clean, low‑profile look along the border.
Step 2: Plan the Deck Size
If you are in the design stage of your deck build, keep in mind that Trex square-edge deck boards are available in 16- and 20-foot lengths. And because the border boards hang out past the joists a bit, they will need to be a few inches longer than the total width and length of the deck frame. So, if you want your deck to be approximately 16 feet long, consider keeping the frame just under 16 feet. That will allow you to save money and reduce waste by avoiding the need for 20-foot border boards. As with any deck, make sure you discuss your plans with your local building officials and acquire any necessary building permits before you begin.
Step 3: Decide on a Layout
You can choose to install two border boards instead of just one, or you could create a deck layout with a curved border. For example, you might use 1x4 composite decking boards for the outer picture frame and wider composite deck boards for the interior field to create a layered look.
In addition to the border boards around the perimeter, consider dividing the deck into sections by adding one or more borders through the center of the deck. And when it comes to the infill deck boards (the boards inside the picture frame), you can add variety by running those deck boards at an angle instead of perpendicular to the house. If you decide to go with one of these routes, you’ll need to carefully consider your blocking strategy (outlined in Chapter 02: Add Blocking to the Substructure). Discover more options for planning a deck.
Step 4: Choose Your Colors
Adding an accent color can enhance your deck with a contrasting picture frame border, while using the same color as your infill boards can add a more understated touch. Here are some popular ways to coordinate colors; just remember to use these as a starting point and let your imagination guide you:
- Match the infill boards to the stair treads, and the border boards to the stair risers.
- Install two border boards side by side of the same color to give the border an even, weightier feel.
- Install fascia the same color as the border boards to create the appearance of a larger, wrap-around border.
- Use two different-colored border boards to tie in more colors from the house or landscaping features.
- Use 1x4 Trex composite boards in a contrasting color for the picture frame border to outline the deck and stairs with a thin, architectural detail.
- Or choose no color variation at all for a sleek, refined appearance.
For more inspiration, check out these curated Trex decking and railing duos.
Step 5: Consider Your Skill Level
Good news! If you have the tools, expertise, and confidence to build a standard deck, you have what it takes to build a deck with a picture frame border. You’ll just need a little more knowledge, which you can get from this simple how-to guide.

Installing blocking is the most important step, and the main difference between framing a picture frame deck and a standard deck. You will need to add two extra joists on each side of the deck:
- One to support the inner edge of the border board
- Another one to support the ends of the infill boards
There is no need for additional blocking on the outside edge of the deck where the band/rim joist is located. The space separating the additional joists depends on how far you want your border board to overhang (more on this below). If your deck includes wood posts, install the posts and post blocking first.

Step 1: Install the First Joist
Install the blocking joist located nearest the outside joist first. To accommodate the deck board screws, align it so the center of the joist is about 1 inch in from the inner edge of the border board. Because of the close proximity of this additional joist to the outside joist, you won’t have access to both sides of the board, which means you won’t be able to install standard joist hangers at the ledger or rim joist.
One option to secure the first additional joist is to fasten blocks of the proper thickness at various lengths down the inside of the existing joist, and then fasten the new joist to the blocks. Finally, secure the new joist to the rim joist and ledger using structural angle brackets.

Step 2: Install the Second Joist
Attach the second, inner joist to the first joist, using the same methods in Step 1. Position it so the center of this joist is about 1 inch in from the end of the infill deck boards. If you plan to have your border board overhang, you might skip the blocks and connect the two blocking joists side by side.
Step 3: Protect Framing with Flashing Tape
Once you’ve added the two extra joists to both sides of the deck, protect the top of all the joists, blocking and stair framing with Trex Protect™ flashing tape and the ledger board with Trex Seal™ ledger tape. Used together, Trex Protect™ flashing tape and Trex Seal™ ledger tape add life to your deck by keeping standing water off critical framing surfaces, sealing around fasteners, and reducing the risk of moisture intrusion at the ledger connection.

Installing the picture frame boards before the infill boards will make it easier to achieve the perfect spacing between the border and infill boards. And remember to use square-edge Trex composite deck boards, not grooved, to picture frame your deck.

Step 1: Install Fascia or Spacing Alignment Blocks
Aligning your border boards flush with the fascia gives your deck a modern look. Follow these steps for the best results:
1. Install the Fascia First: Use our fascia boards installation guide for your border boards.
2. Overhang Option: If you prefer an overhang, attach temporary alignment blocks at the top edge of the joists. This ensures consistent overhang across your deck.
3. Measure for Overhang: Trex Composite Fascia Boards are over 1/2 inch thick. Cut blocks to 1-1/4 inch for an overhang of just under 3/4 inch.
4. Cut and Install Blocks: Rip blocks from scrap lumber. Secure them with screws at both deck corners and every 3 to 4 feet in between.
Step 2: Notch Around Posts (if necessary)
If your border boards need to be cut around railing posts, it’s easier to do this before you cut the miters at the ends. You can follow these steps:
- Set a border board that is longer than you need on both ends, lean it up against the posts, and mark the post locations on the board.
- Measure from the alignment blocks to the posts to determine how much needs to be cut out of the border board.
- Cut the notches in the border board with a jigsaw.
Adding an extra 1/4-inch space around the posts will make the board easier to install and allow for expansion and contraction. That space will be concealed when you install the post-base trim.

Step 3: Mark and Cut the Miters
Once you’ve cut the notches for the posts, slide the border board into position and flush with the fascia or alignment blocks, then mark the location of the miters with a speed/rafter square. When you measure, make sure to include a gap between the two intersecting miter boards. The size of the gap depends on the outdoor temperature at the time of installation.
Leave a 1/8-inch gap if the temperature on the day of installation is greater than 40 degrees Fahrenheit, and leave a 3/16-inch gap if the temperature is lower than 40 degrees Fahrenheit. Cut the miters with a miter saw or a circular saw with a sharp blade. Find out more about cutting composite deck boards here.
Step 4: Fasten the Border Boards
With the border boards cut to size, predrill the holes and install two fasteners every 16 inches, about 1 inch from each edge of the boards. You can secure the border boards with Trex Hideaway Composite Deck Screws or Trex Hideaway Decking Plugs, which feature screw hole plugs made from the same shell material as the decking, making them nearly invisible.
Install the first infill board at the outer edge of the deck, so if the last board needs to be ripped down to size, the cut side will butt against the house and possibly be hidden by flashing.
Step 1: Cut and Install the First Board
Cut the first and the subsequent infill boards, so there is a gap between the infill boards and the border boards. Just as you did with the two-mitered border boards, leave a 1/8-inch gap at each end if the temperature at the time of installation is greater than 40 degrees Fahrenheit, and a 3/16-inch gap if it’s lower than 40 degrees Fahrenheit.
Install fasteners at each joist location on each side of the board. Even if you are using Trex Hideaway Universal Hidden Fasteners, secure the side of the first infill board nearest to the border board with Trex Starter Clips, composite screws, or screws and plugs.

Step 2: Install the Center Infill Boards
The infill boards are installed like any Trex composite deck boards. Make sure to follow the recommended installation procedure for the fastener you are using. Given the long lengths of deck boards and the inconsistencies in lumber dimensions, it’s fairly common for projects like decks to have variations.
Before you cut all the deck boards to the same size, check if the space between the parallel border boards is the same down the length of the borders. If the length varies, you will have to cut your infill boards to accommodate the changes.
Double-check that the gap is consistent on both ends before fastening each board. For long decks, it’s always a good idea to run a string or snap a chalk line every few rows as a reference to make sure you are installing the infill boards in a perfectly straight line.
Step 3: Install the Last Infill Board
If necessary, use a circular saw or table saw with a sharp blade to rip the last deck board to width. To secure the side of the board closest to the house, you will need to use either composite screws, or screws and plugs.
Materials
2” Composite Color Matched Deck Screws
3" Exterior-Grade Wood Screws
Exterior Rated Simpson Strong Tie SD Connector Screws
Fascia Connectors
Fascia Plugs
Fascia Screws


This content was partially or fully generated by AI and has been reviewed by our team to ensure accuracy and relevance.


Copyright © 2026 Trex Company, Inc. All rights reserved.
Photos and videos © 2026 Warner Bros. Discovery, Inc. or its subsidiaries and affiliates. All trademarks are the property of their respective owners. All rights reserved.
- Country
-
Australia
-
Austria
-
Bahrain
-
Brazil
-
Canada English
-
-
Chile
-
Colombia
-
Costa Rica
-
Cyprus
-
Czech Republic
-
Fiji
-
France
-
Germany
-
India
-
Ireland
-
Israel
-
Kuwait
-
Lithuania
-
Mexico
-
Netherlands
-
New Zealand
-
Norway
-
Oman
-
Qatar
-
Saudi Arabia
-
South Africa
-
Spain
-
Sweden
-
Switzerland
-
Turkey
-
United Arab Emirates
-
United Kingdom
-
United States
-
Venezuela
By choosing your country, you acknowledge that you have read Trex's Privacy Policy